MySQL5.7MHA+MaxScale2.0构建高可用环境<上篇>
2016-11-06猿哥PHP技术大全
关注微信公众号
PHP技术大全
每天精彩分享不间断

MySQL读写分离与负载均衡--MHA与MaxScale
环境介绍
Part1: 写在最前
看了某大牛的文章,讲述了一下MaxScale比LVS的好处多多,那您倒是放出来配置文件啊~~大牛说:
需要的单独找我吧,太长了配置文件……
看到这我心中久久不能平静啊。。。联系不上您呐 = =,于是各种资料各种找啊~各种坑各种血崩啊!~~~
由于不知道大牛的配置文件是什么样子,本文仅以随笔的形式,记录下实施过程。也欢迎您和我探讨您在实施MaxScale时遇到的各种问题和心得体会。
Part2: 环境
MySQL5.7 MHA + MaxScale2.0
192.168.1.248 HE1 slave1
192.168.1.249 HE2 slave2
192.168.1.250 HE3 master
192.168.1.251 HE4 MHA-manager
Part3: MHA
MHA的优点不作赘述,看下原理图吧
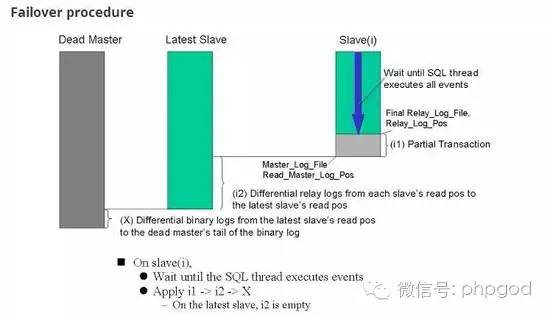
从宕机崩溃的Master保存二进制日志事件(binlogevent)
识别含有最新更新的Slave
应用差异的中继日志(relaylog)到其他Slave
应用从Master保存的二进制日志事件
提升一个Slave为新的Master
使其他的Slave连接新的Master进行复制
构建MySQL5.7MHA
Part1: 写在最前
MHA的部署不是本文的叙述重点,网上比比皆是。这里只记录下MySQL5.7的MHA搭建时的一些坑
Part2: 坑
① mha4mysql-manager-0.57.tar.gz
② mha4mysql-node-0.57.tar.gz
Warning: 警 告 这两个包首先你要搞到,虽然说0.56什么的不代表支持的mysql版本,但经过测试,想要在MySQL5.7上部署MHA,少走坑,请用0.57的。
Part3: 安装包的位置
请在所有的节点包括Manager节点安装好你的mha4mysql-node-0.57.tar.gz,以保证后期在管理节点执行perl Makefile.PL的时候,你能如愿以偿的看到如下信息
[root@HE4 mha4mysql-manager-0.57]# perlMakefile.PL *** Module::AutoInstallversion 1.06*** CheckingforPerldependencies...[Core Features]-DBI ...loaded. (1.609)-DBD::mysql ...loaded. (4.013)-Time::HiRes ...loaded. (1.9721)-Config::Tiny ...loaded. (2.12)-Log::Dispatch ...loaded. (2.26)-Parallel::ForkManager ...loaded. (0.7.5)-MHA::NodeConst ...loaded. (0.57) *** Module::AutoInstallconfigurationfinished.WritingMakefileformha4mysql::manager
Part4: 一些常见错误记录
如果遇到
① 这样
[root@HE2 bin]# masterha_check_repl --conf=/etc/mha/mha.conf Tue Apr 5 22:09:32 2016 - [warning] Global configuration file /etc/masterha_default.cnf not found. Skipping. Tue Apr 5 22:09:32 2016 - [info] Reading application default configuration from /etc/mha/mha.conf.. Tue Apr 5 22:09:32 2016 - [info] Reading server configuration from /etc/mha/mha.conf.. Tue Apr 5 22:09:32 2016 - [info] MHA::MasterMonitor version 0.57. Tue Apr 5 22:09:32 2016 - [error][/usr/local/lib64/perl5/MHA/ServerManager.pm, ln188] There is no alive server. We can't do failover Tue Apr 5 22:09:32 2016 - [error][/usr/local/lib64/perl5/MHA/MasterMonitor.pm, ln424] Error happened on checking configurations. at /usr/local/lib64/perl5/MHA/MasterMonitor.pm line 326 Tue Apr 5 22:09:32 2016 - [error][/usr/local/lib64/perl5/MHA/MasterMonitor.pm, ln523] Error happened on monitoring servers. Tue Apr 5 22:09:32 2016 - [info] Got exit code 1 (Not master dead).
解决方案
用的不是默认端口3306,请修改你的配置文件
② 这样
[root@HE4 ~]# masterha_check_repl --conf=/etc/mha/mha.conf Tue Apr 522:36:33 2016 - [warning] Global configuration file /etc/masterha_default.cnf not found. Skipping. Tue Apr 522:36:33 2016 - [info] Reading application default configuration from /etc/mha/mha.conf.. Tue Apr 522:36:33 2016 - [info] Reading server configuration from /etc/mha/mha.conf.. Tue Apr 522:36:33 2016 - [info] MHA::MasterMonitor version 0.57. Tue Apr 522:36:34 2016 - [info] GTID failover mode =0Tue Apr 522:36:34 2016 - [info] Dead Servers: Tue Apr 522:36:34 2016 - [info] Alive Servers: Tue Apr 522:36:34 2016 - [info] 192.168.1.250(192.168.1.250:4008) Tue Apr 522:36:34 2016 - [info] 192.168.1.248(192.168.1.248:4008) Tue Apr 522:36:34 2016 - [info] 192.168.1.249(192.168.1.249:4008) Tue Apr 522:36:34 2016 - [info] Alive Slaves: Tue Apr 522:36:34 2016 - [info] 192.168.1.248(192.168.1.248:4008) Version=5.6.16-log (oldest major version between slaves) log-bin:enabled Tue Apr 522:36:34 2016 - [info] Replicating from192.168.1.250(192.168.1.250:4008) Tue Apr 522:36:34 2016 - [info] Primary candidate for the new Master (candidate_master is set) Tue Apr 522:36:34 2016 - [info] 192.168.1.249(192.168.1.249:4008) Version=5.6.16-log (oldest major version between slaves) log-bin:enabled Tue Apr 522:36:34 2016 - [info] Replicating from192.168.1.250(192.168.1.250:4008) Tue Apr 522:36:34 2016 - [info] Not candidate for the new Master (no_master is set) Tue Apr 522:36:34 2016 - [info] Current Alive Master: 192.168.1.250(192.168.1.250:4008) Tue Apr 522:36:34 2016 - [info] Checking slave configurations.. Tue Apr 522:36:34 2016 - [warning] relay_log_purge=0 is not set on slave192.168.1.248(192.168.1.248:4008). Tue Apr 522:36:34 2016 - [warning] relay_log_purge=0 is not set on slave192.168.1.249(192.168.1.249:4008). Tue Apr 522:36:34 2016 - [info] Checking replication filtering settings.. Tue Apr 522:36:34 2016 - [info] binlog_do_db= , binlog_ignore_db= Tue Apr 522:36:34 2016 - [info] Replication filtering check ok. Tue Apr 522:36:34 2016 - [info] GTID (with auto-pos) is not supported Tue Apr 522:36:34 2016 - [info] Starting SSH connection tests.. Tue Apr 522:36:35 2016 - [info] All SSH connection tests passed successfully. Tue Apr 522:36:35 2016 - [info] Checking MHA Node version.. Tue Apr 522:36:36 2016 - [info] Version check ok. Tue Apr 522:36:36 2016 - [info] Checking SSH publickey authentication settings on the current master.. Tue Apr 522:36:36 2016 - [info] HealthCheck: SSH to192.168.1.250 is reachable. Tue Apr 522:36:36 2016 - [info] Master MHA Node version is 0.57. Tue Apr 522:36:36 2016 - [info] Checking recovery script configurations on 192.168.1.250(192.168.1.250:4008).. Tue Apr 522:36:36 2016 - [info] Executing command: save_binary_logs --command=test --start_pos=4 --binlog_dir=/log/mysql --output_file=/usr/local/mha/save_binary_logs_test --manager_version=0.57 --start_file=mysql-bin.000009 Tue Apr 522:36:36 2016 - [info] Connecting to root@192.168.1.250(192.168.1.250:22).. Creating /usr/local/mha if not exists.. Creating directory /usr/local/mha.. done. ok. Checking output directory is accessible or not.. ok. Binlog found at /log/mysql, up to mysql-bin.000009 Tue Apr 522:36:36 2016 - [info] Binlog setting check done. Tue Apr 522:36:36 2016 - [info] Checking SSH publickey authentication and checking recovery script configurations on all alive slave servers.. Tue Apr 522:36:36 2016 - [info] Executing command : apply_diff_relay_logs --command=test --slave_user='root' --slave_host=192.168.1.248 --slave_ip=192.168.1.248 --slave_port=4008 --workdir=/usr/local/mha --target_version=5.6.16-log --manager_version=0.57 --relay_log_info=/data/mysql/relay-log.info --relay_dir=/data/mysql/ --slave_pass=xxx Tue Apr 522:36:36 2016 - [info] Connecting to root@192.168.1.248(192.168.1.248:22).. Can't exec"mysqlbinlog": No such file or directory at /usr/local/lib64/perl5/MHA/BinlogManager.pm line 106. mysqlbinlog version command failed with rc 1:0, please verify PATH, LD_LIBRARY_PATH, and client options at /usr/local/bin/apply_diff_relay_logs line493Tue Apr 522:36:36 2016 - [error][/usr/local/lib64/perl5/MHA/MasterMonitor.pm, ln205] Slaves settings check failed! Tue Apr 522:36:36 2016 - [error][/usr/local/lib64/perl5/MHA/MasterMonitor.pm, ln413] Slave configuration failed. Tue Apr 522:36:36 2016 - [error][/usr/local/lib64/perl5/MHA/MasterMonitor.pm, ln424] Error happened on checking configurations. at /usr/local/bin/masterha_check_repl line 48Tue Apr 522:36:36 2016 - [error][/usr/local/lib64/perl5/MHA/MasterMonitor.pm, ln523] Error happened on monitoring servers. Tue Apr 522:36:36 2016 - [info] Got exit code 1 (Notmaster dead). MySQL Replication Health is NOT OK!
解决方案
[root@HE1 MHA]# ln -s /usr/local/mysql/bin/mysqlbinlog /usr/bin/mysqlbinlog
③ 或者这样
Binlog found at /log/mysql, up to mysql-bin.000009 Tue Apr 5 22:43:55 2016 - [info] Binlog setting check done. Tue Apr 522:43:552016 - [info] Checking SSH publickey authenticationand checking recovery script configurations on all alive slave servers.. Tue Apr 522:43:552016 - [info] Executing command : apply_diff_relay_logs --command=test --slave_user='root' --slave_host=192.168.1.248 --slave_ip=192.168.1.248 --slave_port=4008 --workdir=/usr/local/mha --target_version=5.6.16-log --manager_version=0.57 --relay_log_info=/data/mysql/relay-log.info  --relay_dir=/data/mysql/  --slave_pass=xxxTue Apr 522:43:552016 - [info] Connecting to root@192.168.1.248(192.168.1.248:22).. mysqlbinlog: unknownvariable'default-character-set=utf8'mysqlbinlog version command failedwith rc 7:0, please verifyPATH, LD_LIBRARY_PATH, andclient options at /usr/local/bin/apply_diff_relay_logs line 493Tue Apr 522:43:552016 - [error][/usr/local/lib64/perl5/MHA/MasterMonitor.pm, ln205] Slaves settingscheckfailed! Tue Apr 522:43:552016 - [error][/usr/local/lib64/perl5/MHA/MasterMonitor.pm, ln413] Slave configuration failed. Tue Apr 522:43:552016 - [error][/usr/local/lib64/perl5/MHA/MasterMonitor.pm, ln424] Error happened on checking configurations. at /usr/local/bin/masterha_check_repl line 48Tue Apr 522:43:552016 - [error][/usr/local/lib64/perl5/MHA/MasterMonitor.pm, ln523] Error happened onmonitoring servers. Tue Apr 522:43:552016 - [info] Got exit code 1 (Notmaster dead).
解决方案
注释掉 my.cnf 中的
[client]
#default-character-set=utf8
遇到上述错误别慌张,看日志,根据报错来排查问题。
折腾半天,就为了这个OK
[root@HE4 mha4mysql-manager-0.57]# masterha_check_status --conf=/etc/mha/mha.conf
mha (pid:32726) is running(0:PING_OK), master:192.168.1.250
MaxScale2.0
Part1: 写在最前
maxscale 是 mariadb 公司开发的一套数据库中间件,可以很方便的实现读写分离方案;并且提供了读写分离的负载均衡和高可用性保障。另外 maxscale 对于前端应用而言是透明的,我们可以很方便的将应用迁移到 maxscale 中实现读写分离方案,来分担主库的压力。 maxscale 也提供了 sql 语句的解析过滤功能。这里我们主要讲解 maxscale 的安装、配置以及注意事项。

Part2: 整体架构

Part3: 安装
Maxscale配置很简单
[root@HE3 MHA]#  yum -y install maxscale-2.0.1-2.centos.6.x86_64.rpm (只在Maxscale上执行)
[root@HE3 ~]# cat /etc/maxscale.cnf# MaxScale documentation on GitHub:# https://github.com/mariadb-corporation/MaxScale/blob/master/Documentation/Documentation-Contents.md# Global parameters## Number of threads is autodetected, uncomment for manual configuration# Complete list of configuration options:# https://github.com/mariadb-corporation/MaxScale/blob/master/Documentation/Getting-Started/Configuration-Guide.md[maxscale]threads=auto# Server definitions## Set the address of the server to the network# address of a MySQL server.#[server1]type=serveraddress=192.168.1.248port=3306protocol=MySQLBackendmyweight=5[server2]type=serveraddress=192.168.1.249port=3306protocol=MySQLBackendmyweight=5[server3]type=serveraddress=192.168.1.100port=3306protocol=MySQLBackend# Monitor for the servers## This will keep MaxScale aware of the state of the servers.# MySQL Monitor documentation:# https://github.com/mariadb-corporation/MaxScale/blob/master/Documentation/Monitors/MySQL-Monitor.md[MySQL Monitor]type=monitormodule=mysqlmonservers=server1,server2,server3user=mysyncpasswd=MANAGERmonitor_interval=10000# Service definitions## Service Definition for a read-only service and# a read/write splitting service.## https://github.com/mariadb-corporation/MaxScale/blob/master/Documentation/Routers/ReadConnRoute.md#[Read-Only Service]                       ###只读服务#type=service#router=readconnroute#servers=server1,server2,server3#user=sys_admin#passwd=MANAGER#router_options=slave# https://github.com/mariadb-corporation/MaxScale/blob/master/Documentation/Routers/ReadWriteSplit.md[Read-Write Service]####写服务type=servicerouter=readwritesplitenable_root_user=1servers=server1,server2,server3user=sys_adminpasswd=MANAGERweightby=myweightrouter_options=slave_selection_criteria=LEAST_GLOBAL_CONNECTIONSmax_slave_connections=1# https://github.com/mariadb-corporation/MaxScale/blob/master/Documentation/Reference/MaxAdmin.md[MaxAdmin Service]type=servicerouter=cli#[Read-Only Listener]#type=listener#service=Read-Only Service#protocol=MySQLClient#port=4008                                  ##读服务启动监听 端口4008[Read-Write Listener]type=listenerservice=Read-Write Serviceprotocol=MySQLClientport=4006 ####写服务启动监听 端口[MaxAdmin Listener]type=listenerservice=MaxAdmin Serviceprotocol=maxscaledport=6603 ###管理端口
[root@HE3 ~]# /etc/init.d/maxscale start
Starting MaxScale: maxscale (pid 28851) is running...      [  OK  ]
[root@HE3 ~]#  netstat -lntp |grep maxscale
tcp        0      0 0.0.0.0:6603                0.0.0.0:*                   LISTEN      29878/maxscale
tcp        0      0 0.0.0.0:4006                0.0.0.0:*                   LISTEN      29878/maxscale
[root@HE3 ~]# maxadmin -pmariadb list services
Services.
--------------------------+----------------------+--------+---------------
Service Name              | Router Module        | #Users | Total Sessions
--------------------------+----------------------+--------+---------------
Read-Only Service         | readconnroute        |      1 |     5
Read-Write Service        | readwritesplit       |      1 |    11
MaxAdmin Service          | cli                  |      2 |     3
--------------------------+----------------------+--------+---------------
[root@HE3 ~]# maxadmin -pmariadb list servers
Servers.
-------------------+-----------------+-------+-------------+--------------------
Server             | Address         | Port  | Connections | Status
-------------------+-----------------+-------+-------------+--------------------
server1            | 192.168.1.248   |  3306 |           0 | Slave, Running
server2            | 192.168.1.249   |  3306 |           0 | Slave, Running
server3            | 192.168.1.250   |  3306 |           0 | Master, Running
-------------------+-----------------+-------+-------------+--------------------
至此,MHA+Maxscale的环境就完成了。
读写分离与负载均衡校验
Part1: 读写分离
在Master构建相应的测试表
mysql> select * from helei; +--------+| a | +--------+| HE3 | +--------+3 rows in set (0.00 sec)
在slave1插入数据HE1
mysql> select * from helei; +------+| a | +------+| HE3 | | HE1 | +------+
在slave2插入数据HE2
mysql> select * from helei; +------+| a | +------+| HE3 | | HE2 | +------+
现在链接4006读写分离端口,进行数据写入
[root@HE3 ~]# mysql -h192.168.1.250 -P4006 -usys_admin -pMANAGER maxscale -e"insert into helei values('写入');"mysql: [Warning] Using a password on the commandline interface can be insecure. [root@HE3 ~]# mysql -h192.168.1.250 -P4008 -usys_admin -pMANAGER maxscale -e"select * from helei;"mysql: [Warning] Using a password on the commandline interface can be insecure. +--------+ | a | +--------+ | HE3 | | HE1 | | 写入 | +--------+
可以看到主库插入完毕后从库已经同步完成,这条查询完成在了HE1(slave1)上
微信扫描二维码,关注PHP技术大全!
让知识地带无限蔓延

 微信扫一扫,打赏作者吧~